How can I shuffle the order of my quiz questions?

 If you want to shuffle all the questions in your quiz, so that each students gets the same questions but in a different order:

  • From your main course page, click the name of the quiz.  When you're on the landing page for the quiz, click the gear menu and choose Edit quiz


  • On the Edit quiz screen, just check the Shuffle box

You can also divide your quiz into sections.  Shuffling questions is done on a per-section basis.  For example, you can choose to have a section of warmup questions whose order are shuffled, followed by a section of advanced questions that are shuffled.  Doing so prevents advanced questions from appearing too early in the quiz.  Alternatively, you can have sections of questions that are shuffled and other sections that aren't shuffled:

  • At the beginning of any page, click the Add menu and choose a new section heading


  • This will add a Shuffle box at the top of the new section that you can click to shuffle the questions in that section.  If you want to give your section a title, click the pencil icon (seen next to "New heading" below), enter your title, and hit the Enter key when finished.


How can I add or remove extensions in Chrome?

In Chrome you can access your extensions by following these steps:
  1. Click on the 3 dots in the upper right corner of any Chrome window
  2. Select Settings from the list of options
  3. Select Extensions on the left side of the screen
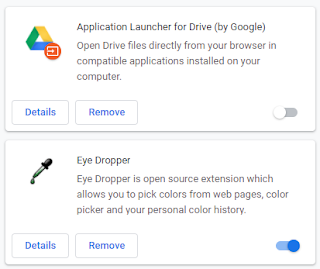
Extensions can be disabled or enabled by clicking the slider.  If the slider is blue, the extension is enabled, and if it is grey then it is disabled.


Disabling an extension temporarily removes that extension's functionality from Chrome.  This is helpful if you only want to use an extension some of the time or if you are doing troubleshooting to see if an extensions is problematic in some way. 

If you want to remove an extension completely, click on the Remove button below that extension.

If you would like to search for new extensions, you can visit the Chrome Web Store. Simply use the search interface to locate extensions that perform specific functions that are useful to you.  Once you find an extension that you want to install, click on the Add to Chrome button. 

Keep in mind that many extensions are created by third party developers and their quality and reliability do vary.  Extensions with higher ratings and more users are generally more reliable than those with lower ratings and/or fewer users. 

How can I update all of the due dates for my course quickly?

You can use the Dates Report to set multiple due dates at once.

To set due dates for individual assignments follow these steps:

  • Click the gear icon in the upper right corner of screen
  • Select More from the list of options
  • Under Reports click Dates
  • Using the Activity type dropdown menu, select Assignments
  • Click Expand All
  • Choose a due date for each assignment. If the due dates for an assignment are grayed out, you will need to click on Enable to the right of the due date to enable this option. Be aware that if you copied the assignment from a previous offering of the class, the year may need to be updated in addition to the month and day.
  • The Allow submissions from and Cut-off date may remain disabled
  • Click Save changes

You can use the Activity type dropdown to select and update dates for other module types such as quizzes and Turnitin Assignments also.

How can I view my Moodle course as a student?

There are times when you may find it helpful to see your Moodle course the way it looks to your students.  To activate student view, click on your profile picture in the upper right and from the dropdown menu select Switch role to...


From the list of options, select Student.  Depending on your role in the course, you may see different options than the ones displayed below. 


You may now view and interact with your course much like a student would.  In the upper right corner above your name you will notice that the word Student appears while you are in this mode. 

Once you are done viewing the course as a student, click on your profile picture again and from the dropdown menu select Return to my normal role.  You will not be able to view and interact with Moodle the way you normally do. 


How can I show a video to my students over Google Meet?

For the best picture and sound quality, post a link to the video in the chat window of Google Meet and ask your students to click the link, view the video, and return to the Google Meet afterwards.

However, if your students watch a video and you want to show clips from that video during lecture, you can take advantage of a feature Google recently added to Meet that allows you to share a video with your students.  You can use this feature for longer videos, but the quality of the video may be degraded by the students' internet connections.

You'll need to be running Chrome in order to take advantage of this:
  1. Open your video (without playing it yet) in a separate tab.  You might want to do this before the meeting begins, just to have it ready.
  2. When you're ready to play the video, mute your microphone.  The audio from the video will come directly from the tab, and any sound from your mic will make the audio from the video cut out.  (Obviously, feel free to unmute if you need to make commentary on the video and you don't mind preempting its audio.)
  3. In Google Meet, click Present now and choose A Chrome tab from the menu.
  4. Choose the tab with the video, make sure Share audio is checked, and click the blue Share button.
  5. Switch to the tab with the video.  You'll see a message saying that you're sharing it in Google Meet.
  6. Play your video.  If you click the "full screen" option, it will take up the entire tab and make the video easier for your students to see.

How do I make Respondus Lockdown Browser and/or Monitor available for a course?

Lockdown Browser is activated for a course by adding the Respondus Lockdown Browser block to your Moodle course. In your Moodle course, turn editing on and in the lower left corner (all the way down) click Add a block and select Respondus Lockdown Browser. The block will appear in the upper right corner of your course.  As the instructor, you don't need to anything on your computer to facilitate the use of Lockdown Browser.

In the Respondus LockDown Browser block click on Dashboard.  Any Moodle quizzes you have will be listed and will work with Lockdown Browser. They do not have to have been created with the Respondus 4.0 software.  Click on the arrow to the left of the quiz you want to add Lockdown to and select Settings to apply Lockdown Browser or Lockdown Browser and Respondus Monitor to a test. 

How can students ask questions during a quiz using Lockdown Browser?

If you want students to be able to ask questions in Lockdown mode, you can use the Moodle chat feature. 

The steps in purple allow you to set up individual chats so that students can't see each other's questions. If you don't mind the students seeing each other's questions and your answers, you can skip these steps.
  • Go to Participants
  • Click on the gear icon and select Groups
  • Click Auto-create groups
  • For Auto create based on select Members per group
  • For Group/member count enter 1
  • Scroll down and click Submit
The create the chat do this:
  • Click Add an activity or resource and select Chat
  • Give the chat a name.  The rest of the settings can remain as the defaults except for Common module settings
  • Under Common module settings, change Group mode to Separate groups 
  • Scroll down and click Save and display 
  • Right click/CTRL click Click here to enter the chat now and select Copy Link Address
To connect the quiz to the chat do this:
  • In the quiz, paste the previously copied link.  It can be within a "description" item in the quiz (this is one of the question type options) or within the body of a question
  • With the link URL selected, click the link button:


  • When the Create link window comes up, paste the URL (again) in the Enter a URL box if it isn't already listed there. Select checkbox for Open in new window
Your chat and quiz are now ready to use.

If you already have groups in your course and you're following the instructions above to create individual chats:
  • Create a grouping
  • Add the one-student groups you created above to the grouping
  • When you set up the chat, under Common module settings, change Group mode to Separate groups as above but also set Grouping to the name of the grouping containing your one-student groups.